Why I built it
My homelab already had a dedicated ai virtual machine with direct access to an NVIDIA RTX 3060, but most of my experiments had focused on language models. I wanted to use the same private, GPU-accelerated environment for image generation and understand the complete path from an empty installation to a repeatable working workflow.
The project had a practical constraint: the GPU has 12 GB of VRAM. That ruled out treating model selection as an exercise in downloading the largest files available. I needed a model combination that fit the machine, left enough disk space for future experiments and could still produce a detailed 1024 × 1024 image.
I chose ComfyUI because its node-based workflows make every stage of image generation visible. For the model, I chose Qwen-Image-2.1 with a quantized diffusion model and text encoder. The result became more than a one-off test: ComfyUI now runs as a persistent service, starts automatically with the VM and provides a foundation for trying other image models later.
This article follows the complete build, including the commands I used, the decisions behind the model files, the first successful generation, the service configuration and the maintenance process I put around it.
What I built
The finished system is a bare-metal ComfyUI installation inside the existing Ubuntu AI VM. The RTX 3060 is passed through from Proxmox, PyTorch uses it directly, and ComfyUI listens on the LAN on port 8188.
| Item | Value |
|---|---|
| VM user | ai |
| Operating system | Ubuntu 24.04.4 LTS |
| GPU | NVIDIA GeForce RTX 3060 12 GB |
| Available GPU memory reported by PyTorch | 11.6 GiB |
| NVIDIA driver | 595.71.05 |
| Driver-supported CUDA version | 13.2 |
| PyTorch | 2.14.0+cu130 |
| PyTorch CUDA build | 13.0 |
| System RAM | 31 GiB |
| Swap | 4 GiB |
| ComfyUI directory | /home/ai/ComfyUI |
| Python environment | /home/ai/ComfyUI/.venv |
| Web port | 8188 |
| Generated images | /home/ai/ComfyUI/output |
| Service name | comfyui.service |
The CUDA version shown by nvidia-smi is the maximum CUDA level supported by the installed driver. PyTorch was built with CUDA 13.0 while the driver reported CUDA 13.2; that combination worked correctly because the installed driver supports the CUDA version used by PyTorch.
Choosing a model that fit the GPU
I installed ComfyUI directly on the VM instead of creating another Docker or Portainer stack. Docker was already available, but a Python virtual environment gave me a simple installation path and direct control over the PyTorch and CUDA packages.
The more important decision was the model combination. The setup that worked uses mixed-precision and quantized components:
| Component | File | Precision | Download size |
|---|---|---|---|
| Diffusion model | qwen_image_2.1_int8_convrot.safetensors |
INT8 ConvRot | 7.26 GB |
| Text encoder | qwen3vl_8b_w4a8.safetensors |
W4A8 | 6.31 GB |
| VAE | qwen_image_2.1_vae_bf16.safetensors |
BF16 | 0.676 GB |
| Total | about 14.25 GB |
For comparison, the all-BF16 model components are approximately:
| Component | Approximate size |
|---|---|
| BF16 diffusion model | 14.2 GB |
| BF16 text encoder | 17.5 GB |
| BF16 VAE | 0.676 GB |
| Total | about 32.38 GB |
The quantized setup saves roughly 56% of model storage. It was the practical choice for the RTX 3060 because the all-BF16 combination would not fit entirely in 12 GB of VRAM and would also exceed the space I had available on the VM.
Stage 1: Checking the VM
Before installing anything, I checked the VM’s hardware, memory, disk, operating system and existing Docker installation:
nvidia-smi
free -h
df -h /
cat /etc/os-release
docker --version
The checks confirmed the starting point:
- RTX 3060 with 12,288 MiB physical VRAM
- 31 GiB system RAM
- 4 GiB swap
- Ubuntu 24.04.4 LTS
- Docker 29.5.3 was present but not used for ComfyUI
Stage 2: Installing ComfyUI on bare metal
With the GPU and available space confirmed, I installed ComfyUI directly under the ai account. The following sequence is the same path I used and can also rebuild the installation from an empty VM. Package-installation commands require sudo permission.
Installing the operating-system prerequisites
sudo apt update
sudo apt install -y git python3 python3-venv python3-pip
I then checked the installed tools:
python3 --version
git --version
nvidia-smi
Cloning ComfyUI
Because /home/ai/ComfyUI did not exist yet, I cloned the official repository:
cd /home/ai
git clone https://github.com/Comfy-Org/ComfyUI.git
cd /home/ai/ComfyUI
On a rebuild, I would run this only when the directory does not already exist rather than cloning over an existing installation.
Creating the Python environment
cd /home/ai/ComfyUI
python3 -m venv .venv
source .venv/bin/activate
python -m pip install --upgrade pip setuptools wheel
The shell prompt began with (.venv) after activation, confirming that subsequent packages would remain isolated inside the ComfyUI environment.
Installing PyTorch and the ComfyUI dependencies
cd /home/ai/ComfyUI
source .venv/bin/activate

python -m pip install torch torchvision torchaudio \
  --extra-index-url https://download.pytorch.org/whl/cu130

python -m pip install -r requirements.txt
python -m pip install -r manager_requirements.txt
I installed the manager requirements as well because I planned to launch ComfyUI with --enable-manager.
Proving that PyTorch could use the GPU
cd /home/ai/ComfyUI
source .venv/bin/activate

python -c 'import torch; print("PyTorch:", torch.__version__); print("Built with CUDA:", torch.version.cuda); print("CUDA available:", torch.cuda.is_available()); print("GPU:", torch.cuda.get_device_name(0) if torch.cuda.is_available() else "NOT AVAILABLE"); print("VRAM GiB:", round(torch.cuda.get_device_properties(0).total_memory / 1024**3, 1) if torch.cuda.is_available() else 0)'

df -h /
The test produced the result I needed before moving on:
PyTorch: 2.14.0+cu130
Built with CUDA: 13.0
CUDA available: True
GPU: NVIDIA GeForce RTX 3060
VRAM GiB: 11.6
Seeing CUDA available: True and the RTX 3060 name confirmed that GPU passthrough, the NVIDIA driver and PyTorch were all working together. If this check had returned False, I would have stopped here rather than trying to diagnose the model workflow later.
Stage 3: Installing Qwen-Image-2.1
With the runtime working, I moved on to the three model components. I used the Hugging Face command-line tool so the files could be downloaded directly into ComfyUI’s expected directory structure.
Installing the Hugging Face command-line tool
cd /home/ai/ComfyUI
source .venv/bin/activate

python -m pip install --no-cache-dir --upgrade "huggingface_hub[hf_xet]"
I confirmed that the command was available:
hf --versionChecking ComfyUI support
cd /home/ai/ComfyUI
grep -c "class QwenImage21" comfy/supported_models.py
The result was greater than 0, confirming that this ComfyUI checkout already contained the Qwen-Image-2.1 model class. This check prevented me from downloading more than 14 GB of model data before knowing whether the application could use it.
Checking disk space
df -h /I kept extra space beyond the advertised model size for temporary downloads, Python packages, generated images and future updates.
Downloading the three model components
cd /home/ai/ComfyUI
source .venv/bin/activate

hf download Comfy-Org/Qwen-Image-2.1 \
  diffusion_models/qwen_image_2.1_int8_convrot.safetensors \
  text_encoders/qwen3vl_8b_w4a8.safetensors \
  vae/qwen_image_2.1_vae_bf16.safetensors \
  --local-dir /home/ai/ComfyUI/models
Because the repository paths already included diffusion_models/, text_encoders/ and vae/, using /home/ai/ComfyUI/models as --local-dir placed every file in the correct ComfyUI folder.
Final locations:
/home/ai/ComfyUI/models/diffusion_models/qwen_image_2.1_int8_convrot.safetensors
/home/ai/ComfyUI/models/text_encoders/qwen3vl_8b_w4a8.safetensors
/home/ai/ComfyUI/models/vae/qwen_image_2.1_vae_bf16.safetensors
Verifying the downloads
cd /home/ai/ComfyUI

sha256sum --check <<'EOF'
cb74113cb03faecd79611b01fd7fd642f0aa60d6f0b95086abee214d75eaa57d  models/diffusion_models/qwen_image_2.1_int8_convrot.safetensors
7754425e55e7bea2bfde4dde59a4cc236cb44e5ee9c215ea66ef8d47012824eb  models/text_encoders/qwen3vl_8b_w4a8.safetensors
bb21f7473051e1ac368515dd3f2e15cd44d7a11748ee8823e1ddca3e4876b7c9  models/vae/qwen_image_2.1_vae_bf16.safetensors
EOF

df -h /
All three files returned OK. After the download, the VM still had approximately 28 GB free.
To inspect their local sizes again:
du -h \
  /home/ai/ComfyUI/models/diffusion_models/qwen_image_2.1_int8_convrot.safetensors \
  /home/ai/ComfyUI/models/text_encoders/qwen3vl_8b_w4a8.safetensors \
  /home/ai/ComfyUI/models/vae/qwen_image_2.1_vae_bf16.safetensors
Stage 4: Starting ComfyUI for the first time
I started ComfyUI manually for the first test. This made it easy to see startup messages and stop the process while I adjusted the configuration:
cd /home/ai/ComfyUI
source .venv/bin/activate

python main.py \
  --listen 0.0.0.0 \
  --port 8188 \
  --enable-manager \
  --lowvram \
  --cpu-vae \
  --reserve-vram 0.5
Each option addressed a specific requirement of this VM:
| Option | Purpose |
|---|---|
--listen 0.0.0.0 |
Allows other devices on the network to open the UI |
--port 8188 |
Uses TCP port 8188 |
--enable-manager |
Enables the built-in ComfyUI Manager |
--lowvram |
Uses model offloading suitable for the 12 GB GPU |
--cpu-vae |
Runs VAE encode/decode in system RAM to save VRAM |
--reserve-vram 0.5 |
Leaves 0.5 GiB, about 512 MiB, unused by ComfyUI |
0.5 means 0.5 GiB, not 50%.
I found the VM’s LAN address with:
hostname -IFrom another computer on the LAN, I opened:
http://VM_LAN_IP:8188At this stage, Ctrl+C in the terminal stopped the manually launched instance.
Stage 5: Building the first Qwen workflow
With the web interface running, I loaded ComfyUI’s official Qwen Image 2.1 text-to-image template and replaced its default model selections with the quantized files I had installed.
- Open Templates in ComfyUI.
- Load the official Qwen Image 2.1: Text to Image workflow.
- In the Text to Image (Qwen Image 2.1) node, select:
unet_name:qwen_image_2.1_int8_convrot.safetensorsclip_name:qwen3vl_8b_w4a8.safetensorsvae_name:qwen_image_2.1_vae_bf16.safetensors
- The stock template may ask for
qwen3vl_8b_int8_convrot.safetensors. That is a different, larger text encoder. Replace it with the installed W4A8 file listed above. - Start with:
- Aspect ratio:
1:1 - Megapixels:
1.0 - Resolution:
1024 x 1024 - Steps:
25 - CFG:
1.0 - Sampler:
euler - Scheduler:
simple
- Aspect ratio:
- Enter a prompt and select Run.
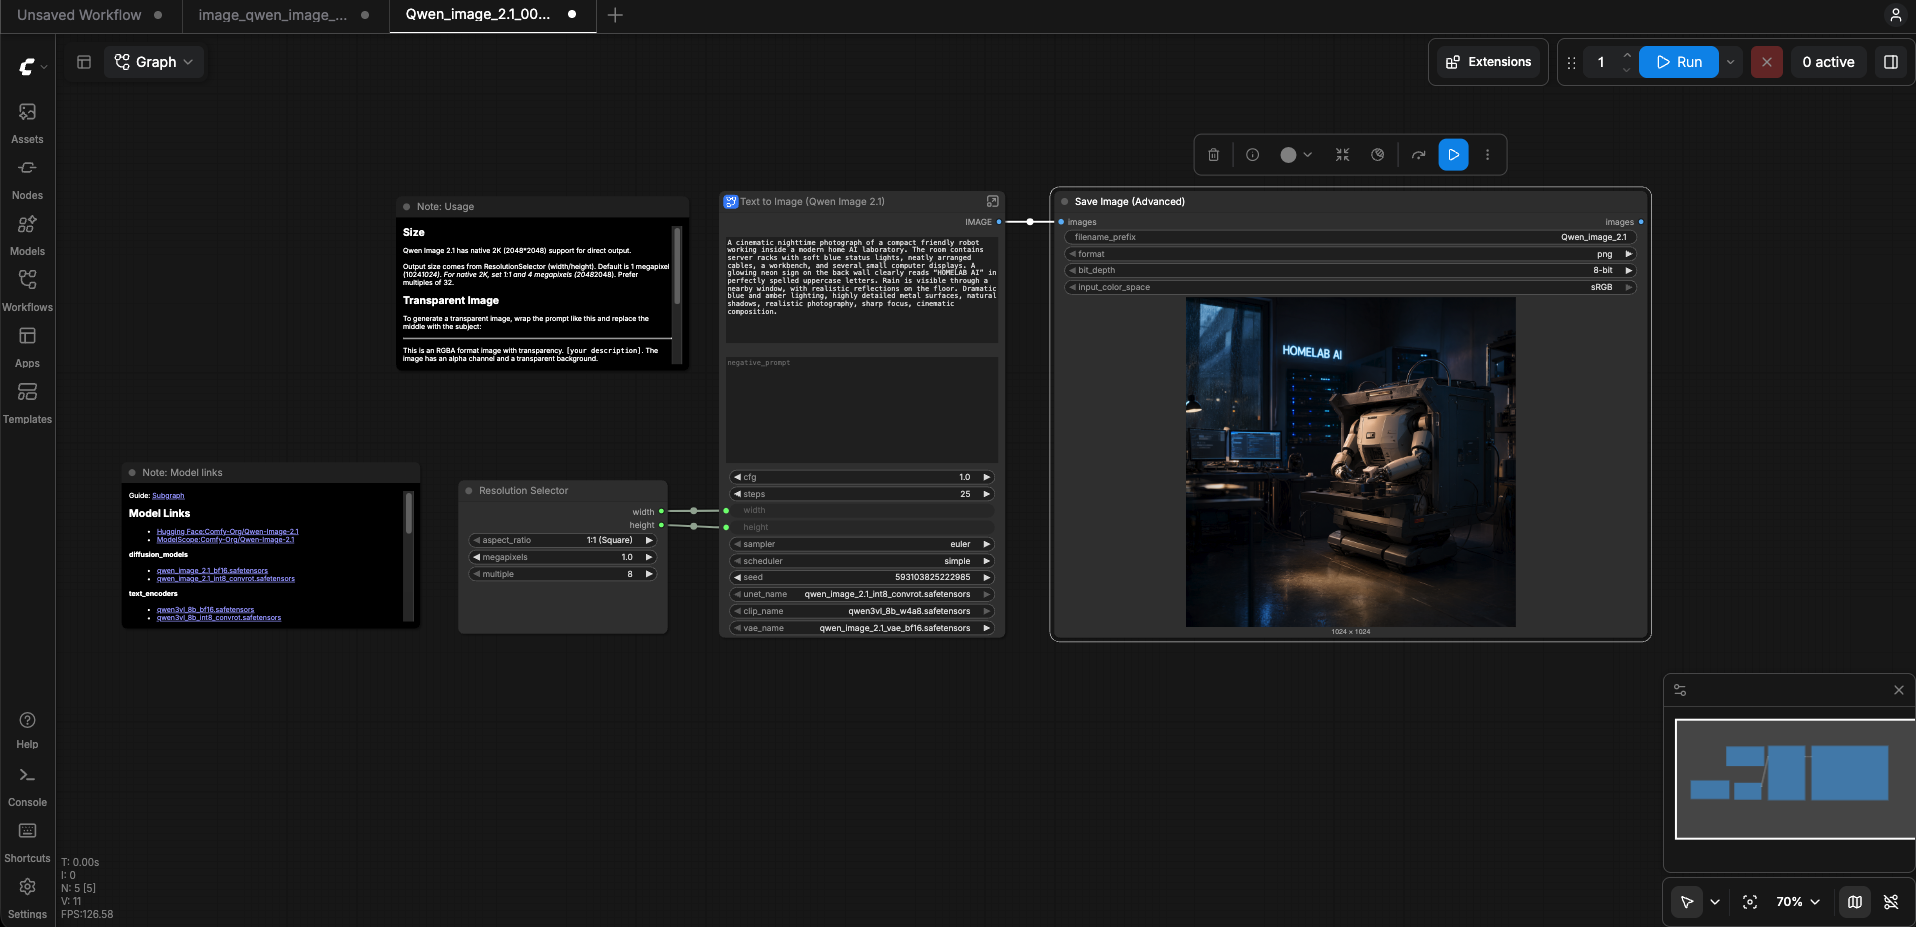
The test prompt used was:
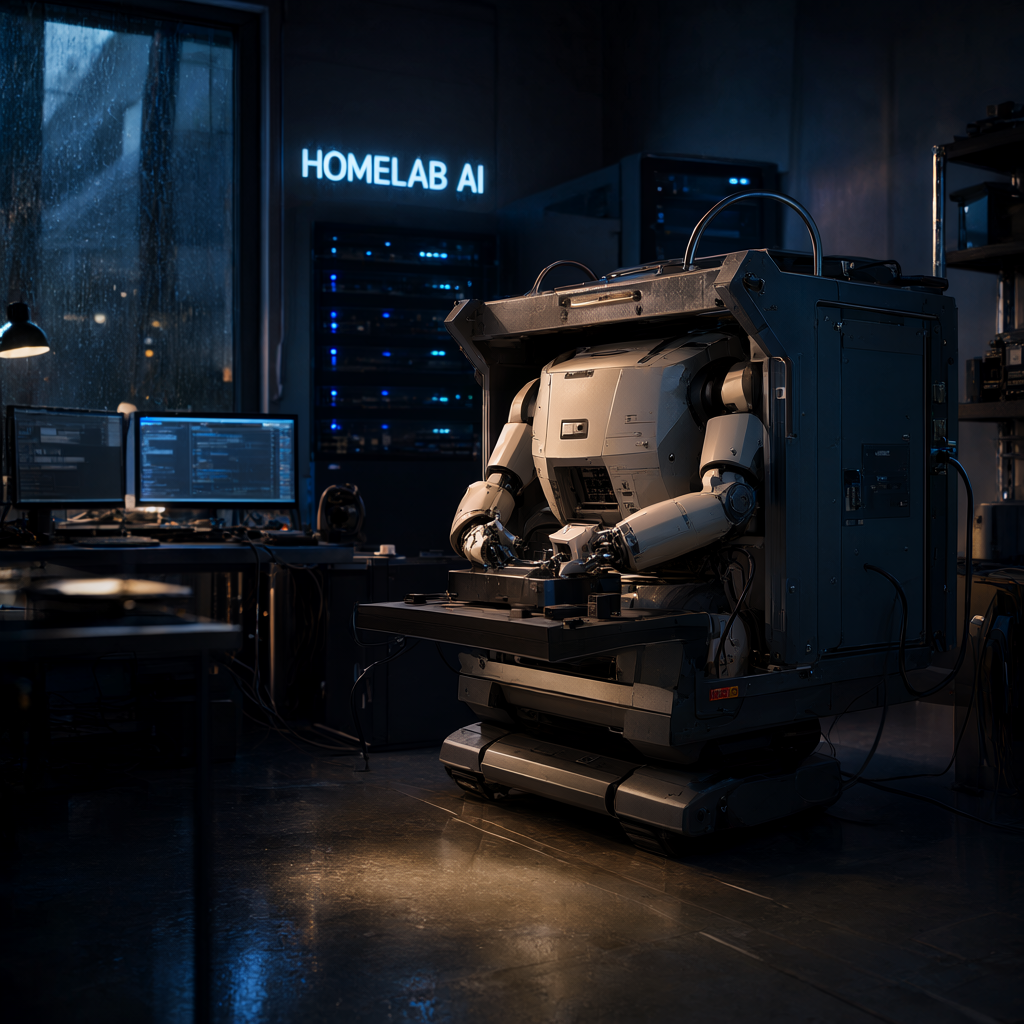
A cinematic nighttime photograph of a compact friendly robot working inside a modern home AI laboratory. The room contains server racks with soft blue status lights, neatly arranged cables, a workbench, and several small computer displays. A glowing neon sign on the back wall clearly reads “HOMELAB AI” in perfectly spelled uppercase letters. Rain is visible through a nearby window, with realistic reflections on the floor. Dramatic blue and amber lighting, highly detailed metal surfaces, natural shadows, realistic photography, sharp focus, cinematic composition.The first 1024 × 1024 generation completed successfully. That result proved the entire path: the browser submitted the workflow, ComfyUI loaded the quantized model components, PyTorch used the passed-through RTX 3060 and the VM wrote the finished PNG to local storage.
Recovering workflows from generated images
ComfyUI saves generated images in:
/home/ai/ComfyUI/output/I used the filename prefix Qwen_image_2.1, so I can list those images chronologically with:
ls -ltr /home/ai/ComfyUI/output/Qwen_image_2.1*.pngTo show only the newest files, I use:
find /home/ai/ComfyUI/output -maxdepth 1 -type f -name 'Qwen_image_2.1*.png' \
  -printf '%T@ %TY-%Tm-%Td %TH:%TM:%TS %p\n' \
  | sort -n \
  | tail -20
One of ComfyUI’s most useful features is that the PNG can preserve its workflow metadata. To return to an earlier generated image and its settings:
- Find or download the earlier PNG from Assets, or copy it from the output directory.
- Drag the PNG onto the ComfyUI canvas.
- ComfyUI reads the workflow metadata embedded in the PNG and restores that generation’s graph, prompt, seed, and settings when the metadata is present.
Stage 6: Turning ComfyUI into an always-on service
Once the manual workflow worked, I replaced the terminal session with a systemd service. ComfyUI now starts automatically with the VM, restarts after a failure and no longer depends on an open shell.
Stopping the manual process
Before creating the service, I stopped the manual process with Ctrl+C so two copies would not compete for port 8188.
Check whether the port is already occupied:
sudo ss -ltnp | grep ':8188'No output confirmed that the port was free.
Creating the service
sudo tee /etc/systemd/system/comfyui.service >/dev/null <<'EOF'
[Unit]
Description=ComfyUI image generation service
Wants=network-online.target
After=network-online.target

[Service]
Type=simple
User=ai
Group=ai
WorkingDirectory=/home/ai/ComfyUI
Environment=PYTHONUNBUFFERED=1
Environment=CUDA_VISIBLE_DEVICES=0

ExecStart=/home/ai/ComfyUI/.venv/bin/python /home/ai/ComfyUI/main.py --listen 0.0.0.0 --port 8188 --enable-manager --lowvram --cpu-vae --reserve-vram 0.5

Restart=always
RestartSec=10
KillSignal=SIGINT
TimeoutStopSec=60

[Install]
WantedBy=multi-user.target
EOF
I verified the account’s primary group with the following command. On another system, Group=ai should be replaced if this prints a different value.
id -gn aiEnabling and starting the service
sudo systemctl daemon-reload
sudo systemctl enable --now comfyui
sudo systemctl status comfyui --no-pager
The service reported:
Active: active (running)Verifying the enabled service
systemctl is-enabled comfyui
systemctl is-active comfyui
The confirmed output is:
enabled
active
To test the full boot path after a convenient maintenance window, I can reboot the VM:
sudo rebootAfter reconnecting, the final check is:
systemctl is-active comfyuiManaging the service day to day
sudo systemctl start comfyui
sudo systemctl stop comfyui
sudo systemctl restart comfyui
sudo systemctl status comfyui --no-pager
sudo journalctl -u comfyui -f
The service calls the virtual environment’s Python directly, so it does not need source .venv/bin/activate. At this point the systemd service is enabled and active, making ComfyUI part of the VM’s normal startup sequence.
Operating and checking the service
After a reboot, update or model installation, I use the following checks:
systemctl is-enabled comfyui
systemctl is-active comfyui
sudo systemctl status comfyui --no-pager
sudo journalctl -u comfyui -n 100 --no-pager
curl -sS -o /dev/null -w 'HTTP %{http_code}\n' http://127.0.0.1:8188/
nvidia-smi
df -h /
An enabled and active service, an HTTP status in the 2xx range and a detected GPU indicate that the installation is healthy.
Stage 7: Backing up the parts that matter
The model files and generated images are large, but the configuration and workflow state are comparatively small. Before updates, I preserve the exact ComfyUI commit, Python dependency list and user directory:
mkdir -p /home/ai/comfyui-backups

cd /home/ai/ComfyUI
git rev-parse HEAD | tee /home/ai/comfyui-backups/comfyui-commit-before-update.txt
source .venv/bin/activate
python -m pip freeze > /home/ai/comfyui-backups/pip-freeze-before-update.txt

tar -C /home/ai/ComfyUI \
  -czf /home/ai/comfyui-backups/comfyui-user-backup.tar.gz \
  user
The user directory can be small when few server-side workflows have been saved. Generated PNGs also preserve workflow metadata, so I back up valuable files from /home/ai/ComfyUI/output separately.
I list the resulting backup files with:
ls -lh /home/ai/comfyui-backupsStage 8: Updating ComfyUI safely
I do not update ComfyUI during an active generation. The update process begins by recording the working state and checking for local changes.
Recording the current installation
cd /home/ai/ComfyUI
git status --short
git rev-parse HEAD
If git status --short shows files I intentionally edited, I stop and back them up. I avoid git reset --hard because it can erase local work.
Stopping, updating and restarting
sudo systemctl stop comfyui

cd /home/ai/ComfyUI
git pull --ff-only

source .venv/bin/activate
python -m pip install --upgrade pip
python -m pip install -r requirements.txt
python -m pip install -r manager_requirements.txt

sudo systemctl start comfyui
sudo systemctl status comfyui --no-pager
sudo journalctl -u comfyui -n 100 --no-pager
Afterward, I open ComfyUI in the browser and run a known working workflow.
Why all three update steps matter:
git pull --ff-onlyupdates ComfyUI’s source code without creating a surprise merge commit.requirements.txtupdates the backend, frontend package, templates, and other required libraries.manager_requirements.txtkeeps the built-in manager usable with--enable-manager.
Updating PyTorch only when needed
I do not replace a working CUDA/PyTorch build during every routine ComfyUI update. I first inspect the current version:
cd /home/ai/ComfyUI
source .venv/bin/activate

python -c 'import torch; print(torch.__version__); print(torch.version.cuda); print(torch.cuda.is_available())'
If the current official ComfyUI instructions require a newer stable NVIDIA build, I use the official index and repeat the GPU test:
python -m pip install --upgrade torch torchvision torchaudio \
  --extra-index-url https://download.pytorch.org/whl/cu130

python -c 'import torch; print("PyTorch:", torch.__version__); print("Built with CUDA:", torch.version.cuda); print("CUDA available:", torch.cuda.is_available()); print("GPU:", torch.cuda.get_device_name(0) if torch.cuda.is_available() else "NOT AVAILABLE")'
Before a future major PyTorch or CUDA change, I will re-check the current command in the official ComfyUI README because the recommended CUDA wheel can change.
Updating custom nodes carefully
Use Manager → Custom Nodes in ComfyUI to update custom nodes individually. Restart the service afterward:
sudo systemctl restart comfyui
sudo journalctl -u comfyui -n 100 --no-pager
I update only the nodes I use and test a known workflow after each group of changes. Third-party custom nodes execute Python code on the VM, so I install them only from sources I trust.
Extending the setup with new models
Building the first working workflow also gave me a repeatable process for evaluating future models. I do not begin by downloading the largest file I see. I first determine whether ComfyUI supports the model and which workflow and components it expects.
Checking compatibility before downloading
- Search the current ComfyUI Templates panel for the model family.
- Check the official ComfyUI repository and current release notes for native model support.
- On Hugging Face, prefer:
- the original model author’s repository, or
- a
Comfy-Orgrepository prepared specifically for ComfyUI.
- Read the model card and license.
- Open the repository’s Files and versions tab.
- Find the official example workflow or template and write down every exact filename it expects.
- Determine whether the model is:
- one checkpoint, or
- separate diffusion model, text encoder, VAE, and possibly vision encoder files.
- Compare the total file size with both free disk and GPU/system memory.
- Prefer
.safetensorsover untrusted.ckpt,.pt, or.pthfiles. Safetensors avoids Python pickle execution during model loading. - Check recent discussions/issues for the exact GPU memory requirement and required ComfyUI version.
The word “latest” can mean the newest upload, the newest model version, or the newest quantization. Do not sort only by upload time; confirm the new file is supported by the current workflow.
Matching each component to its model folder
| Model type | Folder |
|---|---|
| Complete SD/SDXL-style checkpoint | /home/ai/ComfyUI/models/checkpoints |
| Standalone diffusion/UNet/DiT model | /home/ai/ComfyUI/models/diffusion_models |
| Text encoder / CLIP / T5 / Qwen-VL | /home/ai/ComfyUI/models/text_encoders |
| VAE | /home/ai/ComfyUI/models/vae |
| LoRA | /home/ai/ComfyUI/models/loras |
| ControlNet | /home/ai/ComfyUI/models/controlnet |
| Upscaler | /home/ai/ComfyUI/models/upscale_models |
| Vision encoder / CLIP Vision | /home/ai/ComfyUI/models/clip_vision |
Use the folder named by the official workflow. A .safetensors extension alone does not tell you which folder is correct.
Checking available disk
df -h /
du -sh /home/ai/ComfyUI/models
Leave enough spare space for the download itself, updates, and output images. This VM had only about 28 GB free after Qwen was installed, so a 32 GB BF16 model set is not currently suitable.
Previewing a Hugging Face download
Replace the example values with the repository and file path shown on the Hugging Face page:
cd /home/ai/ComfyUI
source .venv/bin/activate

HF_MODEL_REPO="OWNER/REPOSITORY"
HF_MODEL_FILE="path/in/repository/model.safetensors"
COMFY_MODEL_DIR="/home/ai/ComfyUI/models/checkpoints"

hf download "$HF_MODEL_REPO" "$HF_MODEL_FILE" \
  --local-dir "$COMFY_MODEL_DIR" \
  --dry-run
Review the displayed size before removing --dry-run.
Downloading one checkpoint file
For a file stored at the root of a Hugging Face repository:
cd /home/ai/ComfyUI
source .venv/bin/activate

HF_MODEL_REPO="OWNER/REPOSITORY"
HF_MODEL_FILE="model.safetensors"
COMFY_MODEL_DIR="/home/ai/ComfyUI/models/checkpoints"

hf download "$HF_MODEL_REPO" "$HF_MODEL_FILE" \
  --local-dir "$COMFY_MODEL_DIR"
Downloading a multi-component repository
When the Hugging Face paths already begin with ComfyUI folder names, keep those paths and use the parent models directory:
cd /home/ai/ComfyUI
source .venv/bin/activate

HF_MODEL_REPO="OWNER/REPOSITORY"

hf download "$HF_MODEL_REPO" \
  diffusion_models/DIFFUSION_FILE.safetensors \
  text_encoders/TEXT_ENCODER_FILE.safetensors \
  vae/VAE_FILE.safetensors \
  --local-dir /home/ai/ComfyUI/models \
  --dry-run
If the dry run is correct, repeat it without --dry-run.
Handling gated models
Some repositories require accepting a license and signing in. Accept the repository terms in the browser, create a read-only Hugging Face token, and run:
cd /home/ai/ComfyUI
source .venv/bin/activate
hf auth login
hf auth whoami
Enter the token only at the secure prompt. Do not paste a token into documentation, screenshots, shell commands, or chat.
Pinning a model revision
By default, hf download uses the repository’s current main revision. To make a future reinstall reproduce the same file, copy the full commit hash from Hugging Face and add:
hf download "$HF_MODEL_REPO" "$HF_MODEL_FILE" \
  --revision FULL_HUGGING_FACE_COMMIT_HASH \
  --local-dir "$COMFY_MODEL_DIR"
Use the full commit hash, not an abbreviated one.
Verifying the downloaded file
The Hugging Face file page normally shows a SHA-256 value. Compare it locally:
sha256sum /home/ai/ComfyUI/models/checkpoints/model.safetensorsOr let sha256sum perform the comparison:
echo 'EXPECTED_SHA256  /home/ai/ComfyUI/models/checkpoints/model.safetensors' \
  | sha256sum --check
The result must be OK.
Making ComfyUI detect the model
Restart the service after placing new model files:
sudo systemctl restart comfyui
sudo journalctl -u comfyui -n 100 --no-pager
Then refresh the browser, load the official template, and select the exact filenames in its loader nodes.
Testing a new model conservatively
- Use the resolution recommended by the official workflow; if none is given, start modestly.
- Generate one image at a time.
- Keep
--lowvramand--cpu-vaefor the 12 GB GPU. - Watch GPU memory in a second terminal:
watch -n 1 nvidia-smi- Watch ComfyUI logs in another terminal:
sudo journalctl -u comfyui -f- Only increase resolution or batch size after one successful generation.
A future SDXL practice workflow
I selected SDXL Base 1.0 as a future learning exercise because it provides a familiar single-checkpoint workflow and contrasts with Qwen’s multi-component setup. It is an example for practicing the process, not a claim that SDXL is the newest image model.
Repository:
https://huggingface.co/stabilityai/stable-diffusion-xl-base-1.0File:
sd_xl_base_1.0.safetensorsApproximate size: 6.94 GB
SHA-256 recorded for that file:
31e35c80fc4829d14f90153f4c74cd59c90b779f6afe05a74cd6120b893f7e5bBefore downloading, check current disk space and the current file page in case the repository changed:
df -h /

cd /home/ai/ComfyUI
source .venv/bin/activate

hf download stabilityai/stable-diffusion-xl-base-1.0 \
  sd_xl_base_1.0.safetensors \
  --local-dir /home/ai/ComfyUI/models/checkpoints \
  --dry-run
Download after reviewing the dry-run result:
hf download stabilityai/stable-diffusion-xl-base-1.0 \
  sd_xl_base_1.0.safetensors \
  --local-dir /home/ai/ComfyUI/models/checkpoints
Verify:
echo '31e35c80fc4829d14f90153f4c74cd59c90b779f6afe05a74cd6120b893f7e5b  /home/ai/ComfyUI/models/checkpoints/sd_xl_base_1.0.safetensors' \
  | sha256sum --check
Restart ComfyUI:
sudo systemctl restart comfyuiBuild or load an SDXL workflow with this basic graph:
CheckpointLoaderSimple
  ├─ MODEL → KSampler
  ├─ CLIP  → positive CLIPTextEncode → KSampler
  ├─ CLIP  → negative CLIPTextEncode → KSampler
  └─ VAE   → VAEDecode

EmptyLatentImage → KSampler → VAEDecode → SaveImage
Suggested first test:
- 1024 x 1024
- batch size 1
- 25 steps
- CFG 7
- sampler
dpmpp_2m - scheduler
karras - denoise 1.0
Keeping model storage under control
Model files quickly become the largest part of the VM. I use the following command to see which model folders consume the most space:
du -h --max-depth=2 /home/ai/ComfyUI/models | sort -h | tail -30I check the largest generated-image directories with:
du -h --max-depth=2 /home/ai/ComfyUI/output | sort -h | tail -30For the whole filesystem, I use:
df -h /Before deleting a model, I verify that no saved workflow depends on it. Moving an unused model outside ComfyUI’s model paths is a reversible first step:
mkdir -p /home/ai/model-disabled
mv /home/ai/ComfyUI/models/checkpoints/EXACT_UNUSED_FILENAME.safetensors \
  /home/ai/model-disabled/
sudo systemctl restart comfyui
Replace EXACT_UNUSED_FILENAME.safetensors with a filename you have checked. Moving the file on the same disk does not free disk space; it only tests whether anything needs it. Permanently deleting a model is irreversible unless it is downloaded again.
Problems encountered and how I diagnose them
Service fails with “address already in use”
A manually started ComfyUI is probably still using port 8188:
sudo ss -ltnp | grep ':8188'Stop the old terminal process with Ctrl+C, then:
sudo systemctl restart comfyuiService fails immediately
sudo systemctl status comfyui --no-pager
sudo journalctl -u comfyui -n 200 --no-pager
Check that these paths exist:
ls -l /home/ai/ComfyUI/main.py
ls -l /home/ai/ComfyUI/.venv/bin/python
Browser cannot reach ComfyUI
hostname -I
systemctl is-active comfyui
curl -sS -o /dev/null -w 'HTTP %{http_code}\n' http://127.0.0.1:8188/
sudo ss -ltnp | grep ':8188'
sudo ufw status
Expose port 8188 only to a trusted LAN or VPN. Do not forward it directly to the public internet; this setup does not add authentication or TLS.
A model does not appear in a dropdown
- Confirm the exact path and filename:
find /home/ai/ComfyUI/models -maxdepth 3 -type f -name '*.safetensors' -printf '%p\n' | sort- Confirm it is in the correct model-type folder.
- Restart the service:
sudo systemctl restart comfyui- Refresh the browser and reopen the loader node.
A template says a model is missing even though a replacement is installed
The template matches exact filenames. Open the highlighted loader/subgraph and select the installed equivalent manually. For this Qwen setup, the template’s qwen3vl_8b_int8_convrot.safetensors was intentionally replaced by qwen3vl_8b_w4a8.safetensors.
CUDA out-of-memory error
- Keep batch size at 1.
- Reduce image resolution.
- Keep
--lowvramand--cpu-vaeenabled. - Stop other GPU processes shown by
nvidia-smi. - Restart ComfyUI to release fragmented allocations:
sudo systemctl restart comfyuiIf the desktop/display also uses the GPU, increasing --reserve-vram 0.5 to 1.0 leaves another 0.5 GiB for the system but may make generation slower because ComfyUI can use less VRAM.
Manager is absent after an update
sudo systemctl stop comfyui
cd /home/ai/ComfyUI
source .venv/bin/activate
python -m pip install -r manager_requirements.txt
sudo systemctl start comfyui
git pull --ff-only refuses to update
cd /home/ai/ComfyUI
git status --short
git log --oneline -5
Do not discard the changes blindly. Back up intentional local edits, then decide whether to commit, move, or restore them before updating.
A downloaded file belongs to root
Inspect it first:
ls -l /home/ai/ComfyUI/models/PATH/EXACT_FILENAME.safetensorsFix only that confirmed file, not the whole filesystem:
sudo chown ai:ai /home/ai/ComfyUI/models/PATH/EXACT_FILENAME.safetensorsDay-to-day command reference
When I need a compact view of the installation, these commands show the ComfyUI revision, Python environment, model inventory, recent outputs, available disk and GPU state:
cd /home/ai/ComfyUI

git rev-parse HEAD
git status --short

source .venv/bin/activate
python --version
python -m pip --version
python -m pip show torch
hf --version

find /home/ai/ComfyUI/models -maxdepth 3 -type f -name '*.safetensors' -printf '%s %p\n' \
  | sort -n

ls -ltr /home/ai/ComfyUI/output | tail -20
df -h /
nvidia-smi
The operating routine
The finished service is simple to use, but I keep a few checks around the actions most likely to introduce problems.
Before a model download:
df -h /After a model download:
sha256sum /absolute/path/to/model.safetensors
sudo systemctl restart comfyui
sudo journalctl -u comfyui -n 100 --no-pager
Before an update:
cd /home/ai/ComfyUI
git status --short
git rev-parse HEAD
After an update or reboot:
systemctl is-active comfyui
curl -sS -o /dev/null -w 'HTTP %{http_code}\n' http://127.0.0.1:8188/
nvidia-smi
df -h /
The installation is healthy when the service is active, the local web check succeeds, PyTorch sees CUDA, the model files pass their checksums and a known workflow generates an image.
What I learned
The most important decision in this project was not the interface or even the model family. It was choosing components that matched the actual limits of the machine. The quantized Qwen combination kept the download near 14.25 GB and made a 12 GB RTX 3060 useful without pretending that it had the capacity of a much larger accelerator.
The build also reinforced the value of proving one layer at a time. I checked the NVIDIA driver before installing Python packages, checked PyTorch before downloading the model, verified the model files before loading the workflow and ran ComfyUI manually before creating the service. Each successful check reduced the number of possible causes when I moved to the next stage.
ComfyUI’s PNG metadata turned out to be especially useful. A generated image is not only an output; it can also preserve the graph, prompt, seed and settings that created it. That makes selected images part of the workflow backup strategy rather than disposable files.
Finally, an image-generation service needs the same operational care as the rest of the homelab. Checksums, disk monitoring, dependency snapshots, controlled updates and a systemd service are what turned a successful demo into something I can keep using.
The result
The AI VM now runs ComfyUI as an enabled systemd service with direct access to the RTX 3060. From another computer on the LAN, I can open the interface, load the Qwen workflow and generate a 1024 × 1024 image without relying on an external image-generation service.
The first result—a small robot working in a rainy, blue-lit home AI laboratory—was a fitting proof of concept. It was created inside the homelab it depicts, using a model selected around the limitations of the hardware available to me.
More importantly, the project left me with a reusable platform. I can add new model components methodically, compare workflows, restore settings from generated images and keep the service running through reboots. What began as an experiment in local image generation is now another permanent capability of the homelab.